
Hey, Kids! So, after swapping out my stock handlebar… or is it “handlebars” – it’s really only just one bar, right?
Anyway, after swapping it out with the Dime City Cycle Speed, aka Clubman, aka Drop, handlebar, I found that I was plopping too much weight on the front end (I’m a big guy). I kept having to push myself back to lighten the front and get some liveliness back into the front end.
I love the DCC bar. It freakin’ rocks! It’s both fashion and function, it slopes down perfectly, so no way was I going to give it up and go back to ye olde tyme stodgy, grandpa bar. And then it dawned on me. Spacers, duh! (aka, risers.) Next step… I spent a couple nights Googling (stop your snickering) and came to the conclusion that GenMar seems to be pretty much the go-to in this sort of situation. Everybody seems to carry them. Furthermore, their website deems themselves, “The Original Handlebar Riser Company.”

Please note: my bike requires 1″ diameter bars — there are other Triumphs that use 7/8′.
GenMar sells direct. I work for a manufacturer that sells direct (and distributors), so I am very bias. As such, I ordered directly from GenMar.
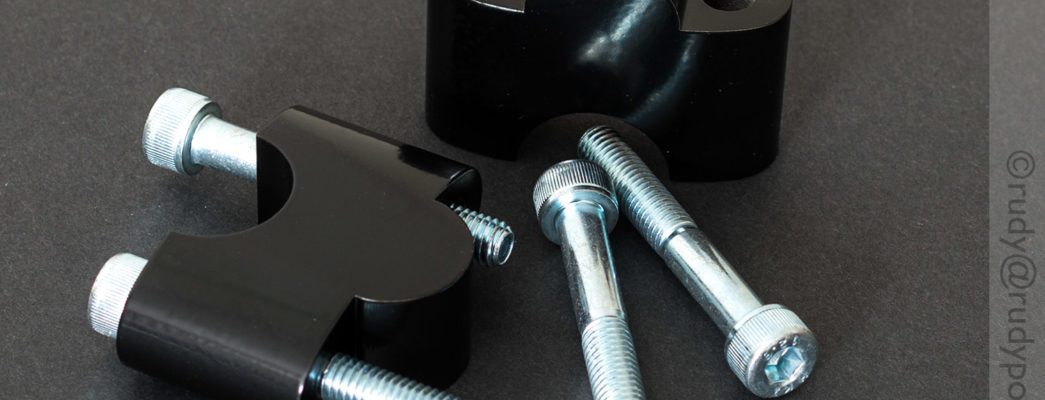
The risers arrived two days later via USPS Priority Mail. Remember how I dogged British Customs for over packing? Well, GenMar pretty much did it proper, though I would suggest bubble wrap as opposed to newspaper. As a New York City dweller, their packaging was ideal – it fit perfectly well in my post box. I didn’t have to be there to receive and sign, I didn’t have to redirect to my super, it was simply stuffed in my box and waiting for me when I got home. Ideal. Included was a universal instruction sheet. This is a super simple mod, so I doubt that anyone with any semblance of mechanical ability would need instructions, but it can’t hurt.

There really isn’t a lot to say. Using an 8mm hex socket (or allen key), simply remove the top clamps and place in a safe spot. You won’t be reusing the bolts as they will be too short for use with the risers.

You’ll want to cover your tank with a towel or some such so as not to scratch it.
If you’re working alone, hold up the bar in one hand and place in the left riser. Lower the bar gently so as to not shift the riser out of place, place the top clamp on, and then loosely tighten in the bolts. You don’t want the riser to slip out while you place in the right side riser but you want enough slop to allow you to move the bar upwards to place in the right side riser. Now go ahead and do the same for the right side.


Like we did for the original handlebar swap, get the bar positioned as you like and then properly torque down the bolts. Tighten in opposing positions so that the bar seats down properly. In other words, snugly tighten top left, bottom right, bottom left, top right (or a similar order), and then torque down. Put Sharpie marks at 6 o’clock as visual cues to warn you if the bolts are loosening.

And there you have it. The handlebar is now 1 1/4″ higher. I like it a LOT better. It gives the front end some breathing room and some relief to my wrists. What’s particularly nice is that the bike still retains the sporty, aggressive look of a proper cafe racer.


On to the next mod!
Tools Required:
8mm Hex Socket
Sharpie
Company URL:
GenMar Manufacturing
UPDATE, 10.22.2014. Official GenMar blurb:
“Our handlebar risers are machined from billet aluminum and finished in either brushed aluminum or black anodized. Shaped like the base of your handlebar mount, they will raise the handlebars upward and back (due to the fork angle), still leaving the motorcycle with a very stock look. Most riders will have to sit on the bike to notice there is something different. It’s more comfortable. Raising the bars up even a mere 3/4″ (19mm) makes a real difference in the weight on your hands. Raising your bars with a spacer design, like our handlebar riser, you raise the bars but still retain the stock angle. This is very important to maintaining even weight distribution across your hands during braking and turning. The GenMar Handlebar Riser is designed to raise your handlebars the maximum your motorcycle will allow. The handlebars will not hit the fairing or the tank when turned full-left or full-right. There is no need to remove or change any of the controls on the handlebars. Most installations can be completed in as little as 10 minutes.”