I think it’s about time to change the name of this blog to handlebarcafe.com. Yep, an install of yet another pair of handlebars. Man, I’m picky! I’m not going to apologize though. The handlebars connect you to the bike. They are one of the most important components of your motorcycle. You and your bike communicate to each other through the handlebars. As such, I’m always striving for the perfect bar.
Previously in Mod #24, I installed Joker Machine’s Zero Angle Clip Ons. These are super high-quality components; however, there isn’t enough clearance for the master brake cylinder reservoir so I couldn’t adjust the right side properly. Also, I had issue with the “zero angle”. They created mucho discomfort in the base of my thumbs (see the post for more info).
Before that, I installed the Dime City drop handlebar which you can read here.
Anyway… at this point, what I want is an adjustable version of the Joker Machine. I gotta tell you. There aren’t a lot of options out there. After much Googling, I came upon Tarozzi clip ons, specifically at Dime City’s website. Tarozzi is an Italian company which I hadn’t heard about before (surprising, as a Ducati lover). Upon further Googling, I found them to be very well respected. Okay, let’s give them a shot.
I ordered a set from Dime City. Unfortunately, if you have 1″ controls (as us T100 owners do), you are relegated to ordering the 7/8″ set with a pair of additional 1″ bars. What this means is that you basically have to buy both 7/8″ bars and 1″ bars. I asked Dime City about this; why can’t I swap out one size for another? Their response was, “Hey, you can sell the 7/8″ bars to a friend.” Not cool in the least. A very weak upsell, to say the least. Unfortunately, I had no other option (which they knew), so I begrudgingly paid the added expense, an extra $80.
Approximately twelve business days later, the clip ons arrived from Dime City.


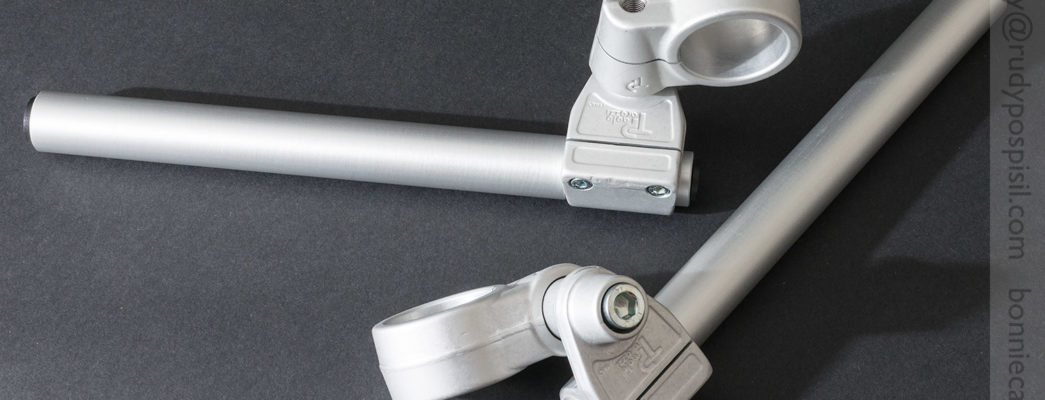
Let’s take a closer look at these pieces. They’re solid albeit a bit rough in their finish. The fork clamps and the bar clamps are individual pieces. You’ll quickly realize that the components can be fitted several different ways on your bike. Experiment. I don’t think there is a wrong or right way. You can piece them together according to what works best for your setup.


Ummm… does anyone else see “urinal” in the photo below? Ha, ha. But seriously… below shows two ways to install on the right side. There are actually several other ways. It’s like an Erector Set.

As this is my third iteration of handlebars, I’m not going to go into great detail. 1. I already have with the Dime City install and the Joker Machine install, and 2. I’m installing upon an already modded install, so the steps most likely won’t apply to your situation.
Oh, new tip: I picked up a new tool – a rubber mallet. I bought from Home Depot for $5. It works beautifully. Tap, tap, tap the top yoke without any damage. Trust me, you’ll quickly find other uses for the mallet. I should have bought one sooner.

The photos below show how I installed on the T100. Because of the front brake master cylinder on the right side, it was necessary to install the handlebar clamp with the curved thin portion frontwards. There was absolutely NO clearance issues. If you read my Joker Machine Clip On install, you’ll know that there was a serious clearance issue. Not so with these Tarozzi clip ons. They fit perfectly.


One caveat… because of the nature of how the fork clamp bolts to the handlebar clamp, it is HIGHLY important that you tighten the retaining bolt properly. I don’t have proper torque settings but trust me, it needs to be TIGHT. Honestly, it’s not the best design.

They look good, ¿right?. Perhaps some black powder coating to make them look even better?


I’ve ridden these for a few hundred miles and I must say, they are quite “buzzy”. I feel much more vibration than I did with the Joker Machine or Dime City handlebars.
The photos below show the difference between the 7/8″ and the 1″ bars. Different materials, different thicknesses. I’m going to fab some sleeves that will allow me to fit the Triumph controls onto 7/8″ bars. I’ll let you know if this makes a difference.


As you can see with the 1″ bars, they are thick walled. Your typical bar end mirror adapters may not work. They have to be less than 16mm.
Cheers.
Company URL:
Paolo & Franco Tarozzi
Price:
Purchased at Dime City: Clip Ons: $129 + 1″ bars: $79 + Shipping
The stepped 1″ bars seem like a bit of a rip off. I didn’t have that option and also had 7/8″ Oberon bar end winkers and mirrors I wanted to use. I couldn’t find anyone that was willing to machine a thin walled sleeve at sensible prices so the “solution” I used was to cut some 25mm PU plumbing tube which was a tight fit on the 7/8″ bars and for good measure, two turns off duct tape in the area where tye control clamps bite.
After a few hundred miles it’s all still good. Haven’t experienced the buzzing you mention but my front is 18″ with a Pilot Road 4, tubeless conversion, Dynabeads and Intiminators in the forks, so it’s not going to be a fair comparison.
Great thing is you can adjust them every which way to get them just right.
They look super good! Worried about the buzzing you mention though. Now that it’s been a couple of days since the install, what’s your take on them?