In Bonnie Mod #16, I removed the rear fender by way of the Maund Speed kit. The Maund bracket itself is a very solid piece. However, the supplied Lucas-style tail light by Dixie/EMGO is incredibly cheap. During this past winter, the tail light died on me. Removing the rear fender looks extremely cool but functionally, it creates issues with the tail light assembly. Following the tail light failing, the left turn signal’s running light stopped working. I first thought it to be a bad bulb but upon opening up the light, I was shocked to see a tremendous amount of corrosion in the Lockhart Phillips unit.

Looking underneath, it’s easy to see how prone the lights are to getting grime into them. I hadn’t really thought of this before and realized that I should have sealed everything up. I will rectify that in this post.

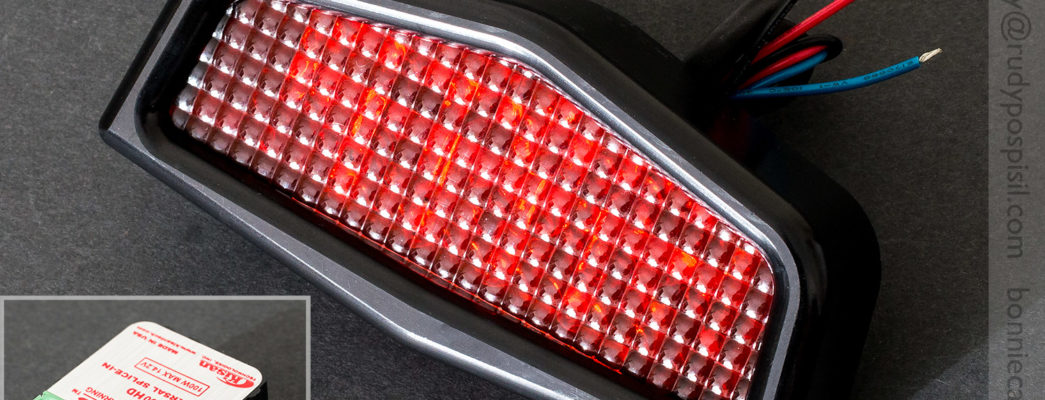
Anyway, back to the tail light itself. I wanted to replace the cheap-o Dixie/EMGO with something much more substantial. I did a lot of Googling and couldn’t find any good options until I stumbled upon the Joker Machine LED Lucas-Style Rear Tail Light in the 10th page of Google Images.
I went ahead and ordered it. I also ordered a Kisan Brake Light Modulator. I’m a big fan of Kisan and reviewed their bulb unit. I have their modulator bulb for the Dixie/EMGO tail light. I checked with Kisan about the Joker Machine LED tail light and they said that the Kisan 100HD Splice-In Tailblazer would fit the bill perfectly.
The Joker Machine light arrived first. I was very impressed with its quality. It an extremely nice piece of billet aluminum.


I began to install the Joker Machine light onto the Maund bracket and immediately encountered a problem. The mounting holes of the Joker Machine light are spaced wider than the mounting holes on the Maund bracket. As such, I couldn’t mount the light. I needed to extend the holes on the bracket.
I did a Google search on how to extend/lengthen holes in metal and using a step drill bit seemed most promising. I picked one up at Home Depot for $20.

The step drill bit worked beautifully. I clamped the Maund bracket onto a heavy cutting board with a C-clamp and went to work. Within five minutes, I had two holes drilled next to the original holes and finished up cleaning them up with a metal file.

The Joker Machine taillight could now be mounted to the Maund bracket. Note that the Joker Machine taillight doesn’t come with mounting hardware. I picked up two 6MMx15MM hex head bolts and lock washers from Home Depot. These worked perfectly.


This time around, I made sure to seal the lights as much as possible. I cut out a full seal from gasket material and used heat shrink tubing to seal the wiring.


By now, the Kisan brake light modulator arrived. Included was a modulator unit, ground wire, rubber hood to protect the terminal strip, velcro fastener, and instructions.


Alright, let’s get this all on the bike. The following picture shows how the wiring should go. The Joker Machine tail light has three leads: 1. brake light, 2. running light, and 3. ground. (Note: the Dixie/EMGO taillights only have two leads, they ground themselves to the frame.)
The important aspect to note is that the running light does NOT hook into the Kisan. It bypasses it completely. You are only modulating the brake light.

I’m going to skip through the install of the Maund Speed bracket and the wiring of the turn signals. I have that fully documented in the BONNIE MOD #16 Maund Speed Fender Eliminator Kit + New Bonneville Wiring Harness post. Besides, this post is all about the brake light and brake light modulator.
Fast forward to installing the Kisan Tailblazer between the New Bonneville Wiring Harness and the Joker Machine LED Lucas-Style Tail Light. This is fairly simple. First off, the Joker Machine blue lead is the running light and plugs into the running light lead of the New Bonneville harness. Again, reference the BONNIE MOD #16 Maund Speed Fender Eliminator Kit + New Bonneville Wiring Harness post for a fully drawn out wiring diagram of the harness. Note that you will need to fashion a male bullet plug for the blue lead in order to plug it into the harness.
The Joker Machine red lead clamps into the Kisan modulator in the output terminal. The brake light lead from the New Bonneville harness clamps into the input terminal of the Kisan. Note that you will need to create a male bullet plug extension with a stripped end in order to do this.
Finally, clamp the Joker Machine ground along with the Kisan supplied ground wire into the grounding terminal of the modulator. The Kisan ground will then be attached to the frame along with the ground of the New Bonneville wiring harness.
The following image should help clarify the situation:

Now tidy everything up… (note: the red rubber hood is a bitch to put on. I really had to struggle with it, so much so that I could have easily snapped off the terminal strip. Kisan needs to make it a bit larger in diameter.)

There you have it. In terms of safety, this is a superior mod. The Joker Machine tail light, aside from being substantially more robust and visually appealing, is noticeably brighter and the Kisan brake light modulator really makes drivers behind you notice that you’ve hit the brakes. I’m super happy with this combo. Actually, this triple because the Joker Machine fits perfectly with the Maund Speed bracket (after a little fab, of course). Quite a vast improvement from the Dixie/EMGO light.

Tools Required:
6mm Allen
Crescent wrench
Wire cutters
Step drill bit
Very small Philips head screwdriver
Gasket material
Heat shrink tubing
Lighter
6mm x 15mm bolts
Blue Loctite
Company URL:
Joker Machine
Kisan Electronics
Price:
$100 – Joker Machine LED Lucas-Style Tail Light
$80 – Kisan 100HD Tailblazer Splice-In Brake Light Modulator
Your thorough explanation of trials and tribulations to obtain a fully functioning, retro looking rear lighting conversion for the modern Bonnie is appreciated.
It’s worth noting that the original Lucas tail lights of this style (called the ‘564’ model used for about 6 years from the late 1950s to the early 1960s) were of a far superior quality than the commonly available Chinese made part you had the problems with.
While there can be no doubt that the Joker item is of good quality emitting a far brighter (and safer) light, if someone wanted to keep a period vintage look to the tail light using a replica ‘564’ I recommend soldering an electrical (crimp) ring connector to the outside body of the bulb holder which will serve as a superior ground when a wire is run from the ring connector to the frame. This will eliminate 90% of the electrical issues affecting these lesser quality ‘564’ copies. Used with a dab of dielectric grease on the metal part and contact area of the stop/tail bulb and a dab of silicone sealant around the area of the bulb holder where the wires exit, the long term efficiency of this type of reproduction tail light can be greatly enhanced. A very thin smear of regular grease, applied around the rubber gasket which seals the red plastic lens to the pressed steel body will help to keep the elements out. Sadly some of these cheaply made copies of the ‘564’ don’t even have a rubber sealing gasket thereby exasperating the problems.
Again, thanks for the excellent overview of your conversion.
Roger
This is great info!!! Thanks for sharing, Roger.
Rudy